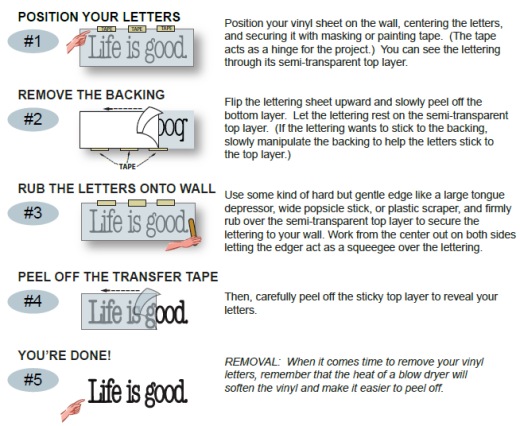
Application Instructions
Applying our vinyl lettering, wall art, and decals is easy!
Your vinyl arrives as a pre-spaced sheet of letters made up of three layers:
1. the top layer (or transfer tape)
2. the middle layer (the actual letters/decal)
3. the bottom layer (white backing paper)
Before applying your vinyl, we recommend allowing the lettering/decal to first come to room temperature. If your order has been shipped, gently press the vinyl sheet flat before proceeding with the instructions below.

Frequently Asked Questions
Are cars the only things I can apply your decals to?
No. You can apply our vinyl decals and lettering to most smooth surfaces. This includes cars, trucks, boats, RV’s, motorcycles, skateboards, bicycles, helmets, storage bins, school binders, and more.
Vinyl may not adhere to heavily-textured surfaces, but can adhere to lightly textured walls. Installation on certain surfaces such as brick, stucco, concrete block, suede paints, and sand paints is not recommended.
How do I remove a decal?
Slowly peel away the vinyl, starting at the corners.
Once I remove a decal, can it be used again?
No. Once a vinyl decal has been removed, it cannot be used again.
What if I do not apply my vinyl right away? Does it last forever?
No. We cut your vinyl lettering fresh after you place your order. Once you receive your order, we recommend applying the vinyl within two months. However, for best results, it is recommended you install within a few days of receipt.
The longer vinyl sits, the harder it becomes to apply. The adhesive will eventually dry out if not applied to a surface. If you are not ready to apply your letters right away, store them in a relatively cool, dry place in a plastic bag. Avoid extreme temperature changes. Do not fold or crease your lettering or get it wet.
Common Application Issues
Applying vinyl to a moderately textured surface.
If the surface is lightly to moderately textured, try using a blow-dryer on the low heat setting to warm up the surface before applying vinyl. Always use caution when applying heat, and run dryer on the lowest setting.
Vinyl is curled from shipping.
This is common. Allow vinyl to “relax” on a flat surface. Place heavy objects (example: books) on top to speed up the process.
Vinyl is sticking to the original backing and not the transfer tape.
Lay vinyl on a flat surface with original backing side down. Using a credit/debit card or similar tool, rub over the transfer tape to “reactivate” the glue.
Application Videos
- How to apply vinyl to tile
- How to apply vinyl to glass blocks
- How to apply vinyl to walls
- How to apply vinyl to car windows